
Check Your Brakes! A Trailer Electrical Repair
- By Captain DIY
- •
- 08 Oct, 2017
- •
There has been a call to action! Time to learn something new.
Disclaimer-Captain DIY and DIYtoFI.blog highly recommend exercising extreme caution when attempting DIY projects. Not everybody can do everything, and some things should only be done by professionals. Keep your digits attached, and keep the insurance company off of your back. Do it right or call the right people!
This has been a time of broadening horizons for ol’ Captain DIY. Just the other day I was approached by my good friend Dan the Builder
about an issue he was having with his trailer.

See, his trailer brakes were intermittently losing connection, and he was thinking it was an electrical problem ready-made for the Cap. No problem, off I go to raise my vehicular electrical experience by 100%. In other words, this would be my first ever attempt at repairing the electrical system on something with wheels.


As his littles and mine happen to be peas in a pod, I loaded up the two Privates into the DIY Mobile
and off we went. I brought my hand tools, including my multi-meter, and some scrap wire just in case I had to pull a new piece of wire.

Once all the Privates had scampered off to their respective play spaces and Dan and I had the trailer to ourselves, it was time to start the testing
. Not having any experience in this arena, I started with a visual inspection of all of the wiring of the trailer to see if I could find any broken connections. An intermittent issue tells me there is a connection that is coming loose
, occasionally making contact and then losing it again.

All connections looked decently solid, so it was time to move on to the truck connection point. Dan turned on his rig and pressed the brakes while I used my tester to check for voltage
on the terminals. When he pressed the brakes I was getting 12 volts, so it seemed that was not the issue. Of course, I had done a visual inspection prior to testing just to make sure there wasn’t an issue there.

After a lot of checking, remaking connections that looked a little shady, and head scratching
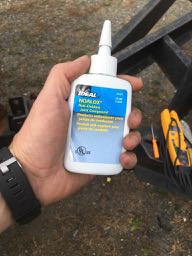
, I determined the next step would be to get some dielectric anti-oxidation compound
to put on the terminals and ensure a proper connection between truck and trailer. Naturally this was the thing I hadn’t brought with me, so off I went in the DIY Mobile back to Headquarters to check the stash. I knew I had some, and fortunately I had recently organized, thereby giving me a chance of finding what I needed.
Compound in hand, I confidently made my way back to the offending connection point and slathered on the goop
.
Hurray! We are showing a connection! Captain DIY has saved the day again!
Reassuring Dan that I had known all along what the problem was and simply was checking to see if he would suggest it at some point, I then began the process of collecting my charges and attempting to stuff them into our chariot.
After a mere half hour of collecting and stuffing, we were ready to victoriously ride off into the sunset
and regale ourselves with tales of our glory. If you happen to find yourself in a similar situation, now you may have an idea of how to go about the testing process. Send any questions
over the Captain’s way if you’re having an issue and we can work it out together!