
How To: Install a Subfloor
- By Captain DIY
- •
- 12 Oct, 2017
- •
Stop falling through your attic floor and put down something solid!
Disclaimer-Captain DIY and DIYtoFI.blog highly recommend exercising extreme caution when attempting DIY projects. Not everybody can do everything, and some things should only be done by professionals. Keep your digits attached, and keep the insurance company off of your back. Do it right or call the right people!
There is a fairly large project underway here at the Headquarters, and astute readers (you are an elite bunch) may have seen the pattern. It all started with the window replacement, and now it is time to start working on the floor.
Our attic has been sitting unused, unloved, dusty and filled with our old crap. That phase of it’s life has ended, and a new vibrant phase of life has begun as we make the transformation from Scary Attic to cozy Master Bedroom. We have filled the roof bays with closed-cell foam insulation
and quickly covered that with drywall so as to avoid having to paint it with a fire retardant. Now we’re looking down.

The creaky old tongue-and-groove floorboards that were haphazardly left kicking around have got to go, and in their place we are installing some 3/4” OSB
subfloor. Once we pulled the old boards out of the way it was time to mark out our center lines and measure out from there to figure out where to start.
As this house is not perfectly square, or straight, or anything helpful at all , we had to do a bit of trimming to make sure the first piece ended at the halfway point on a joist. Gotta leave room for the next one, after all.

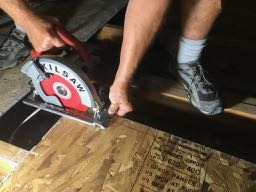
Pro Tip:
As Guest Expert Tom the-Guy-Who-Knows-How-to-do-Lots-of-Stuff is showing us, when trimming a small amount off of the end of a sheet, setting the finger against the end of the board provides a solid track to follow to make sure our line is nice and straight. Line up the blade on the mark, set the non-trigger hand against the board and hold the saw on the bottom. Watch out for fingers! We want to hang on to as many of those as possible. Holding the saw firmly, glide along with your finger on the edge as you cut, and you should have a nice straight line . Practice on a scrap piece if it makes you feel better.
Okay, we have a piece the right size, we know where it’s going, time to put it in place. Wait! We still need to put down a bead of construction adhesive
on the joists to help prevent squeaky floors and keep everything as solid as my love of fermentation. To make sure it sticks well, give the tops of the joists a quick sweep .

Now we’re ready to lay it down. For real. This can be tricky, since you don’t have a floor yet, but you can do it. Just don’t think about how much it would hurt if you stepped in the wrong place, or how much work it would be to repair the ceiling you step through, or how far it is to the floor below. Best not to think at all, really. Ever.
The sheet of subfloor is in place, and it is glued. Now to screw. Or nail, if you have a nail gun. As I do not, screwing shall commence. On the ends along the joist I want to put screws every six inches
to make a good solid edge, but in the middle I can space it out every foot or so.

This is where a chalk line
comes in very handy. Hooking the string on one end of the floor over the center of the joist, I set the other end down with the string pulled taught and give it a snap. Just like that, a nice clear indicator of where to screw.

Since I started with the center sheet, I will lay the next one down on one side of it, making sure the end seams are at least two joists apart. Same procedure here, now that we have all of the tricks down it should be a breeze. A difficult, sweaty, curse-inducing breeze. As long as we stagger the seams
and keep checking to make sure we’re following a straight line, life will be good!

Check back in later to see the finished product, and after that we’ll start working on the finished floor! Before we do that, however, we need to make sure the rest of the room is done. The finished floor should be one of the last things to be done, so we have less chance to ruin it.