
How To: Brew Beer Day 27-Time To Drink!
- By Captain DIY
- •
- 21 Oct, 2017
- •
The Big Day is here!
Disclaimer-Captain DIY and DIYtoFI.blog highly recommend exercising extreme caution when attempting DIY projects. Not everybody can do everything, and some things should only be done by professionals. Keep your digits attached, and keep the insurance company off of your back. Do it right or call the right people!
The big day has finally arrived! The culmination of a month-long experiment in fermentation, the moment the world has been waiting for! A very small piece of the world, but the world none the less!
The Beer is ready!
Captain here, and today is the day I brought up a handful of bottles from the basement and put them in the fridge. In an extreme show of confidence in myself, I picked up a six-pack of a local pilsner in case the home brew proved to be undrinkable. Off the DIY crew went to the kids’ school for the Annual Harvest Feast, where we were subject to an amalgamation of screaming schoolchildren pretending to eat dinner together and terrorizing the surrounding forest.
Upon our haggard arrival back home, I quickly went to check on the chilliness of my babies. The temperature on the outside of the bottles was satisfactorily cool, and so I quickly whisked the most junior Private off to bed and grabbed a pint glass from the cupboard.

With excitement and a great deal of nervousness, I pried off the cap of a bottle. A slight sound of gaseous release gave me some hope, and the frothy head that appeared on the top of the glass was a beautiful sight indeed. Lo and behold, it even smelled like beer!

With a nod to the Fermentation Gods, I tipped back my glass and drank, waiting to experience some foul bacteria bath enveloping my tongue in sour disappointment. But, interestingly enough, the cool and bubbly liquid that spilled into my mouth was delicious and refreshing!
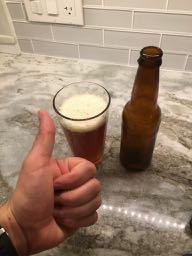
The beer was a success!
After a month of hard labor (actually mostly waiting and drooling over the buckets and bottles) my five gallons of homemade beer was a consumable product. The boost of confidence is uplifting and inspiring, and you can be sure, dear reader, there will be another batch in the fairly soon future.
Now to the numbers.
As I mentioned at the end of Day 1, the cost of the brewing kit was $100 from my local home brew store, and while I was there I purchased an ingredients kit that cost $50. The brewing kit is reusable of course, so the amount per beer goes down with every batch. I ended up with 43 bottles, which comes out to a total cost of $1.16 per beer factoring in only the ingredients. Add in the cost of energy to cook it and the water to fill it, and we’re looking at around (and this is a rough estimate) $1.30 per beer.
For reference, the back-up beer I bought was $10 for a six-pack of 16 ounce cans, working out to $1.67 per can. Not a huge savings, but darn it all, we live to Do Things Ourselves! Also, in the future I will looking for cheaper ways to buy the ingredients, now that I have a bit more confidence in my ability. Hopefully future batches will have the price per bottle driven down to under one dollar. Look for a new batch in the future!
